If you are already registered Chemius user, then you can simply log in with your credentials. If you are new to Chemius, then you must create a new account.
Email is essential – if you don’t provide the right address, you won’t be able to activate your account.
Lat but not least, please enter your company name. Company name is important, because Chemius will automatically create a new company in your private database. Therefore, you will be able to create and store products-chemicalsin the company inventory.
Before you proceed.
If you would like to receive information about Chemius, tips and tricks, new features or regulatory news and information on safety data sheets, labels, poison centre notifications, biocides, REACH and all sorts of valuable chemical regulatory related information, then check this box and sign up to our newsletter.
When ready, let’s get started.
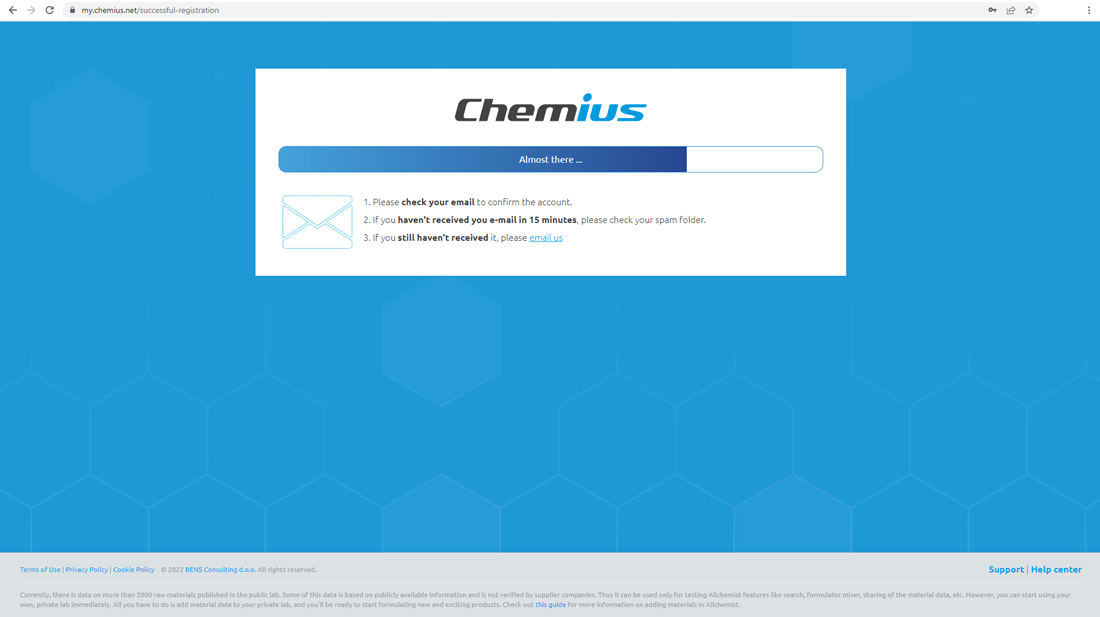
You are almost there.
To complete the registration, please check your inbox for the activation email. You should receive an email like this. All you need to do is click on the activate the account button and … you’re done! Great job. Now you can sign in with your credentials.
What if…
You don’t receive the activation email?
There are three possible reasons for that:
The email landed in the spam or junk folder. Please check if the email is there.
The email didn’t arrive. To resend the email, try to sign into Chemius and then click the link to resend the email.
Maybe there was a typo in your email. In this case, you’ll need to sign up again.
If all these options fail, we’re here to help. Call us or drop us an email.
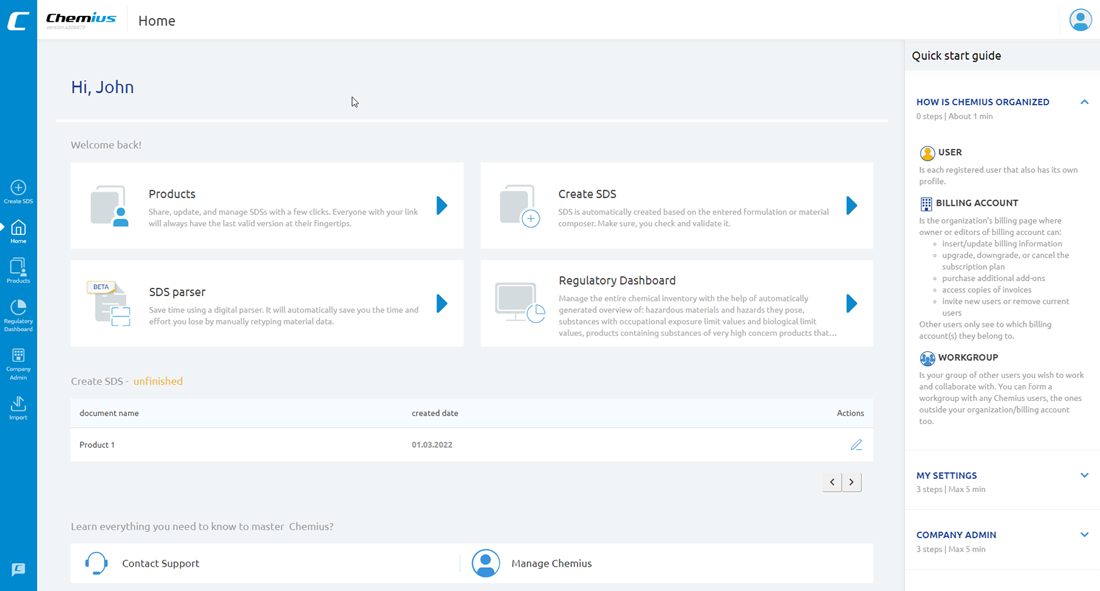
This is the first screen you see when you sign into Chemius. Let me quickly show you around.
This is the home screen.
Here you can find frequently used tools and actions.
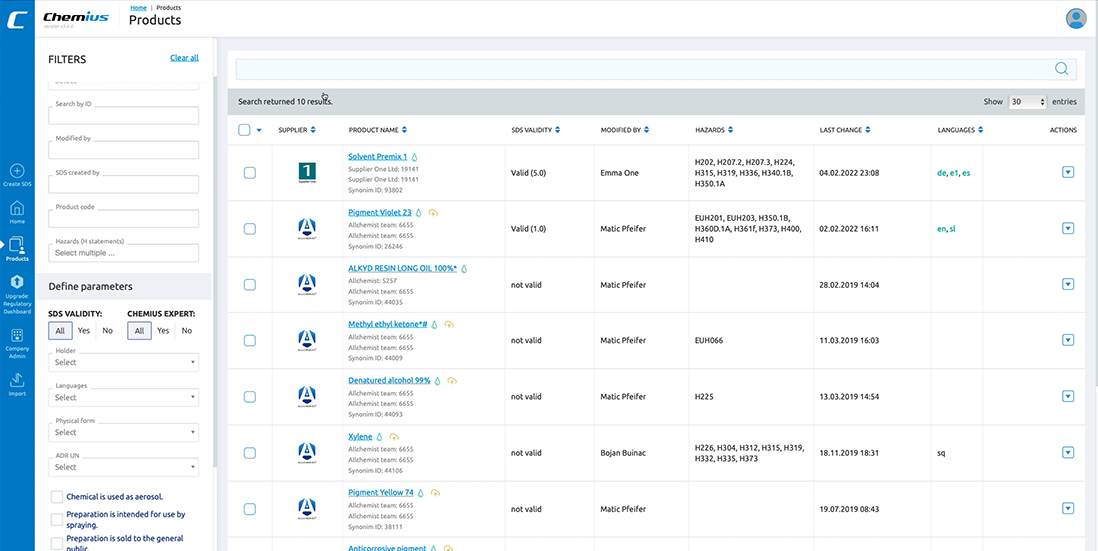
The products section is the most frequently used section. This is the database of products – the products you created, the products somebody else shared with you, and the products you saved from websites. This database is PRIVATE to you. This is your private lab. Nobody else but you (and the colleagues you authorize) can see the products in this database.
The second most frequently used action is Create. Here you can create/add materials or formulations to your private lab – to your private database of products.
SDS Parser is the cutting-edge AI safety data sheet reader or assistant which is still in the beta phase. To put it simply: it transcribes or converts safety data sheets from PDF files into Chemius. This is the fastest way for you to build your product inventory from PDF safety data sheets.
Please note it’s not a magic wand, yet. Its effectiveness depends on the quality of source safety data sheets and here I’m not talking about the quality of information but rather the way the information and data are presented in a specific safety data sheet. If you have computer-readable SDSs, the SDS parser will be 95 % accurate and 99% effective. However, if you have SDSs that are not computer-readable, then you cannot expect good results.
Think of it as an early version of google translate.
The next revolutionary module in Chemius is the Regulatory dashboard. It’s a real gem. Regulatory dashboard scans your product inventory for substances of concern and visualizes the data, in a way so you can early identify potential risks.
At the bottom, you have links to knowledge hub, support, Chemius account management, and a switch for quick tips that are displayed in the right sidebar.
At the top, you have the menu that helps you navigate Chemius and quickly access the tools and features.
In the upper right corner, you have a drop-down where you can access your account settings, company administration page, import, and export features as well a help center.
I’ll show you each of these features in the following videos.
This is the first page you see when you sign into Chemius.
If you want to learn how to navigate Chemius and what all these tools are, please watch the quick introduction.
In this video, I’ll show you the products section and how to get products – materials and formulations – into Chemius.
Let’s go
When you sign in for the first time, in most cases – especially if you have never heard about Chemius before – your product database will be completely empty.
However, there may be some products in your database in some cases. These are the products that some other Chemius user had previously shared with you via Chemius. You’ll recognize these products.
So, in the product database, you can have two groups of products:
Products that some other Chemius user had previously shared with you via Chemius
Products that you create. These can be…
Materials, or
Formulations
First, let’s focus on shared products
Basic Chemius is FREE OF CHARGE if you use it only for collecting and managing safety data sheets, labels and safety instructions that were shared with you.
Just think of it: instead of collecting safety data sheets in PDF files, you can now collect digital safety data sheets in Chemius and you will be able to track hazards, search, and filter products in seconds. This is the future of safety data sheet management and it’s FREE OF CHARGE!
Just ask your suppliers if they’re capable of supplying DIGITAL safety data sheets in Chemius.
Let me show you how it works
Let’s say that Emma is your contact at Supplier One Ltd that supplies you Solvent Premix 1 that you use in your company.
All she needs to do is:
select the product in her product database in Chemius and
share it with you by entering your email address.
And… here it is!
Emma has successfully shared a product with you.
You also received an email containing the link to the respective product.
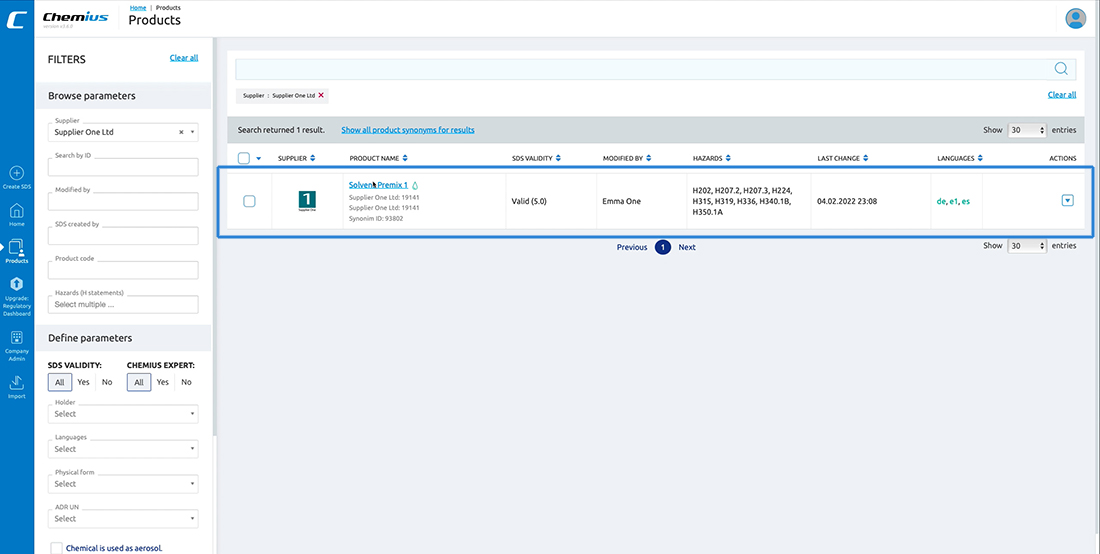
When you open your product database in Chemius, the product – Solvent Premix 1 – will be on your list. You will see:
logo
product name and the supplier
SDS status – if it’s valid or not – in this case, safety data sheet is valid, and version is 2.0.
the person who last changed the product
hazards
date when the product was last changed, and
Available languages. This safety data sheet is available in 3 languages: English, Spanish, and German.
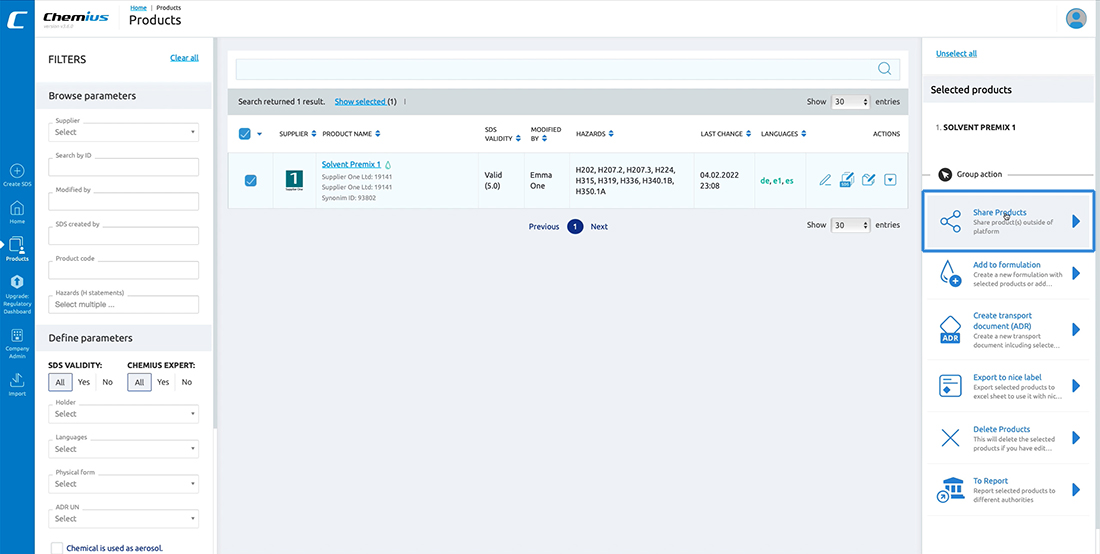
Now that the product has been LINKED to your account, you’ll AUTOMATICALLY receive all updates – whenever the product is changed.
Your supplier needs to share it with you only once.
Furthermore, you will be able to use the product in a formulation or further share it with your customers, colleagues, and partners.
Or… if you don’t want or need this product in your database, you can simply delete it.
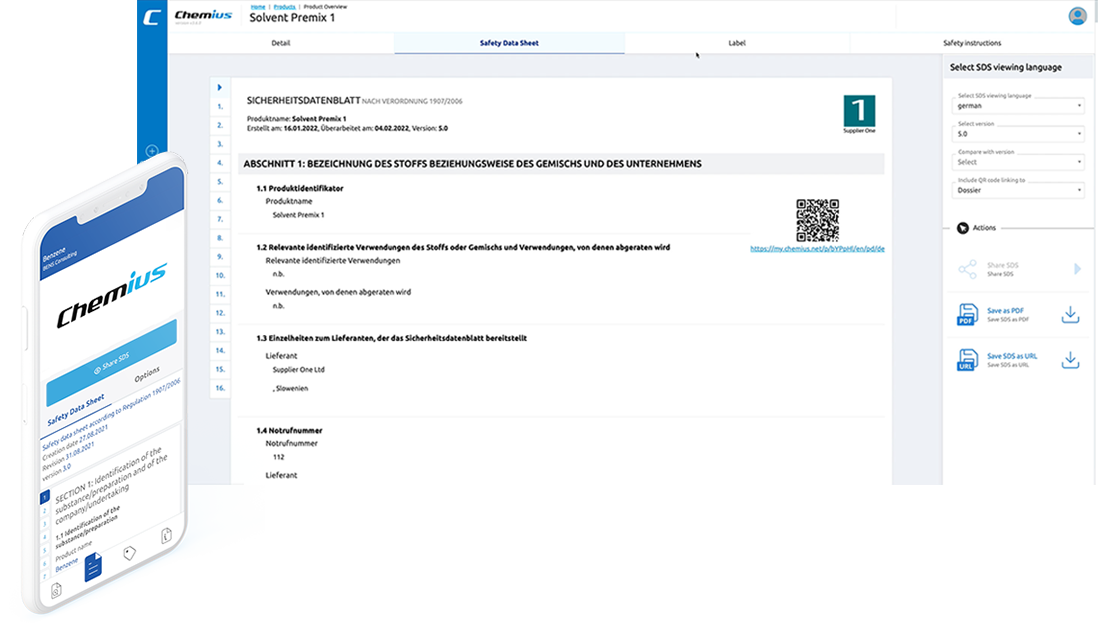
To see more information about the product, you can open it by clicking the product name.
Now you are looking at the Chemius interactive dossier, which is divided into four sections:
Detail
Safety data sheet
Label
Safety instructions
in the detail section, you can see selected properties of the product. It gives you a quick overview.
Next, the safety data sheet section shows you the latest valid safety data sheet.
You can also see the hazard label of the product – which is in line with the safety data sheet.
and last but not least, you can also see safety instructions which are intended for professional and industrial users.
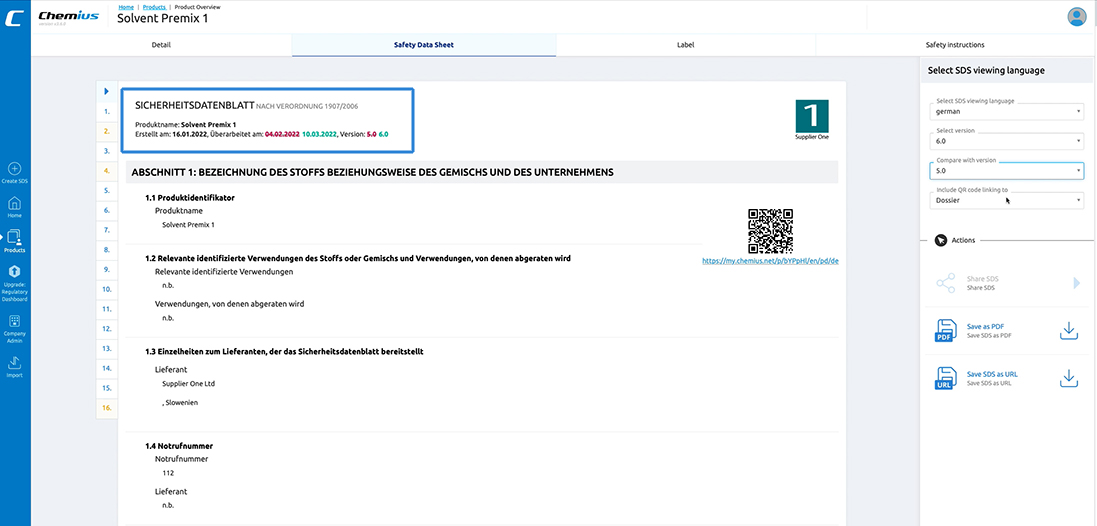
Let’s see what happens when the product is changed
If Emma updates the SDS, you’ll IMMEDIATELY receive the updated version.
Let’s say Emma removes one of the hazards and adds a measure into section 4.
Now, refresh your product list.
The SDS status is instantly showing version 3.0.
If you open the SDS, you will be able to compare versions to see what has changed.
The current version is already selected – now select earlier version to compare with.
You can see that in the new version, the H304 was removed, and a measure was added in section 4.
Furthermore, if you open the label, it’ll be automatically aligned with the latest version of the safety data sheet. And the same applies to safety instructions.
You see how simple it is. Chemius completely automates your safety data sheet management process. And the basic account is completely free of Charge. You don’t have to pay anything if you’re only collecting and reading SDSs, labels, and safety instructions.
If you like, you can also create up to 3 SDSs for free. Sign up now at www.chemius.net and give it a try.
To learn how to navigate the Chemius interactive dossier, subscribe to our YouTube channel and follow us on LinkedIn.
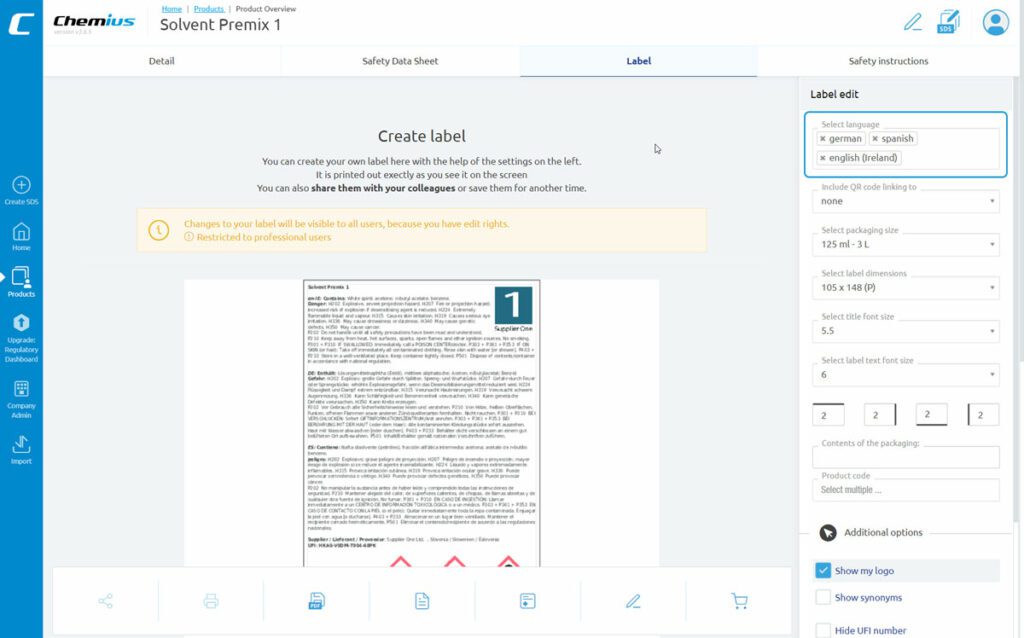
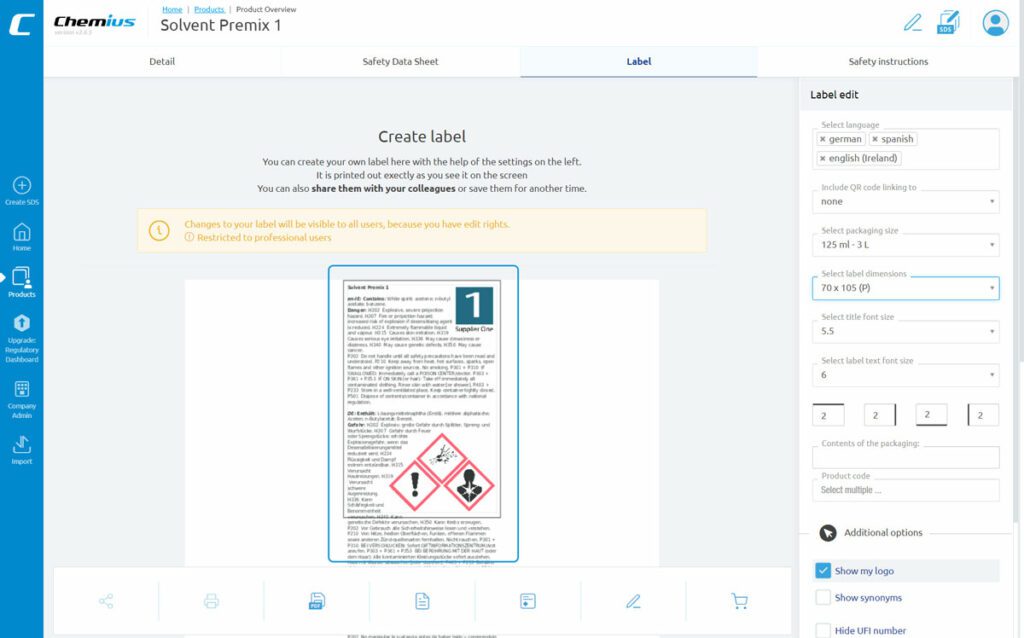
So, let’s take a look at the settings. The first is the language setting.
Here you can select one or more languages for the label. This way, you can quickly and easily create multilingual labels for your products.
For example, if you sell your product in Germany, the UK, and Spain, you can add all three languages to the label
1. Now, as you can see, the text is out of the frame. But don’t worry. We will correct this shortly
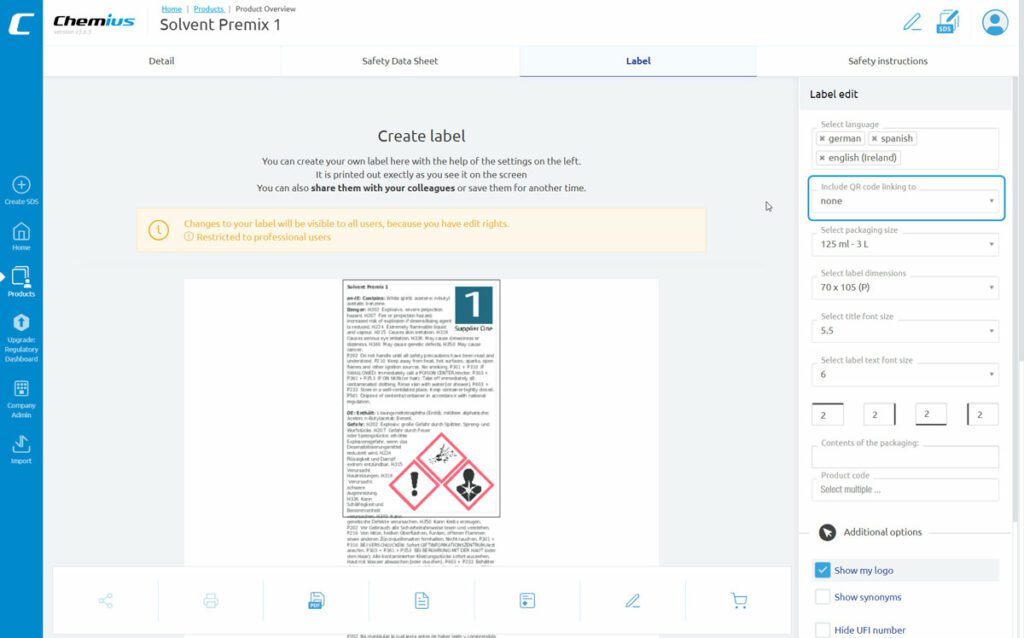
2. Let’s go to the next setting – “Include QR code“. With this setting, you can control the QR code on the label
The default setting is “Dossier”, which means that scanning the QR code with your mobile device will get you to the mobile product dossier.
On the other hand, if you choose the “SDS” setting, the QR code will get you directly to the SDS.
If you don’t want a QR code to appear on the label, choose “none”. The QR code will disappear from the label.
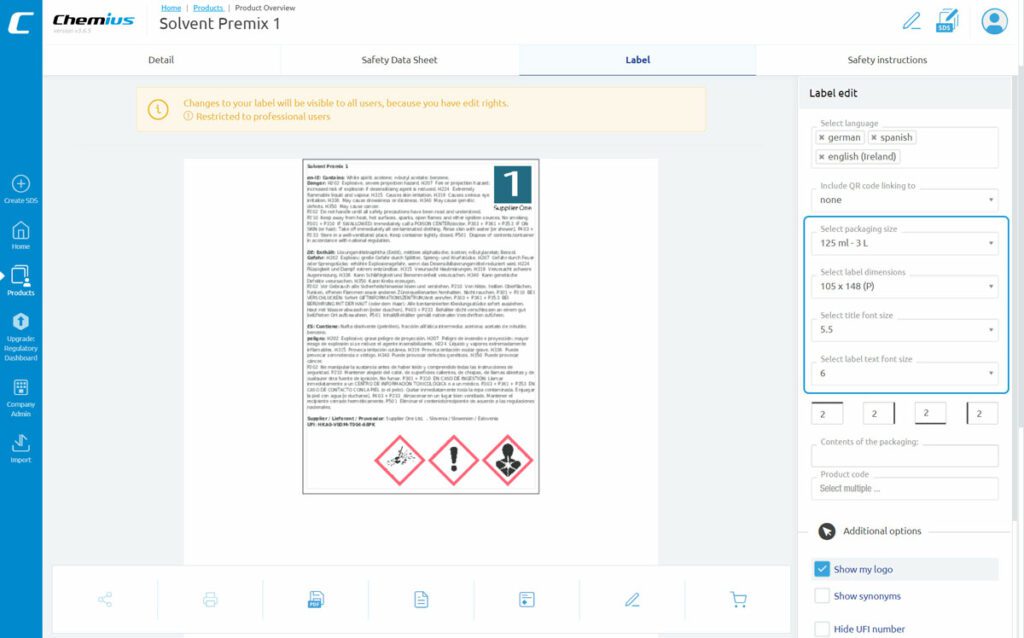
3. In the next step, choose the packaging size
This setting is critical since it affects the size of the pictograms.
According to the CLP Regulation, the size of the pictograms must correspond to the size of the packaging .
In other words, the larger the packaging size, the larger the pictograms.
It’s logical since you cannot use tiny pictograms on a 1000 Litre packaging.
So far, we have set the number of languages, the size of the pictograms, and whether we want to use the QR code on the label or not.
These settings determine the content of the label.
With the rest of the settings, you adjust the label parameters to the content.
We have developed the most efficient safety data sheet authoring and management suite in the industry.
First, you need to specify the size of the label to fit the content.
Please keep in mind that the label must be big enough to fit the packaging and not cover the information or elements that could be already printed on the packaging (for example, a barcode).
If there’s not enough space for a big label, you can choose smaller fonts. For example, you can set the font size for the title – product name; and the font size for the rest of the text.
Please note that the minimum recommended font size is 6.
However, in some cases, when you have a very small packaging (for example, less than 125 ml), you can use fonts smaller than 6.
Chemius will not allow you to use fonts smaller than five since the text would no longer be legible.
You can play with the label and font size to get the optimal result.
If you cannot find the perfect fit, you can try adjusting the margins.
Here you can adjust the top, right, bottom and left margins. The units are in millimeters. I recommend you use at least 2 mm margins.
3.Next, you can enter the contents (or the nominal quantity) of the packaging
For example, if the nominal quantity of the packaging is five liters, you enter “5 L”. For 250 ml packaging, enter “250 ml”. And so on.
If the nominal quantity is already indicated somewhere on the packaging, you don’t have to include this information on the label.
However, be careful not to cover it with the new label.
Besides the contents, you can also include product codes on the label.
Here you can select one or multiple product codes if they are available.
If there are no codes available for this product, you must first add them. To add the codes, go to the “synonyms edit” function. You can find the “synonyms edit” icon next to the “SDS edit” or “product edit” icon in the “Products” view.
Please note that only editors can assign codes to products. If you are not authorized to edit a specific product, you cannot add the codes.
At this point, your label should be ready to print.
Made by chemical regulatory professionals for chemical regulatory professionals.
Create, manage and share SDSs in one place | No credit card needed
This website uses cookies. We use cookies to allow you an unimpeded and user-friendly experience. By further use of this website, you agree with our cookies policy.